Flixnet theme, Part 1: Base layout
In this part we'll create the required theme files, plan out how the layout should look like and implement it in QML.
Initial files
I'm on Linux, so my theme directory is at ~/.config/pegasus-frontend/themes. I'm creating a new directory called flixnet-tutorial, and in it my theme.cfg, like this:
name: Flixnet tutorial
author: Mátyás Mustoha
and the basic theme.qml:
import QtQuick 2.0

FocusScope {

}
Now I open Pegasus and select this theme on the Settings screen. I'll keep Pegasus open during the development, and refresh the theme with the F5 key. I also open the main log file ~/.config/pegasus-frontend/lastrun.log which will tell me if I've made any errors in the QML file.
Tip
You can use whatever text editor you like. Qt Creator is cross platform, has good auto-complete and syntax highlight features. For a more lightweight editor, Sublime Text with the QML package, Atom or Notepad++ could be used, among others.
Note
You might see .qmlc files popping up in your theme's directory. These are cache files, generated for faster loading. When copying the theme to a different machine, you don't have to bring them, they'll automatically get generated the next time you launch Pegasus.
Some planning
If we simplify it a bit, here's how its structure and navigation looks like:
As you can see, there are two main axes of motion:
- a horizontal game axis for each collection's games
- a vertical collection axis for selecting a collection
Each row can be individually scrolled, and the currently selected game is the topmost row's first (fully visible) item. Furthermore, the rows themselves can also be scrolled vertically. This kind of layout makes the theme a bit complex, but other than these axes the rest of the theme seems to be simple enough.
The game selection layout will take the whole lower half of the screen. On a standard 16:9 screen I want to show 2 rows of games to appear, and incrementally more on screens with smaller aspect ratios. Using Pegasus' virtual pixel values, I can design the theme for a screen with at least 720px height, and the values will scale appropriately for other resolutions. Based on that,
- if the height of the list is half the screen's height, I'll have 360px at least
- if I want to show two rows, one row's full height in the list will be 180px
- I'll use 18px font size for the collection's name
- to have some space around the text, I'll use 250% line height; that's 45px out of the 180px so far
- I'm left with 135px height to use for the game boxes
- the game boxes will have a 16:9 aspect ratio, so their width will be 240px
Ok, let's start coding!
Initial layout
Let's start with the hard part, the layout on the bottom half. This is a vertically scrollable list of horizontally scrollable lists, each containing boxes for the games. Because collections are what contain the games, I'll first start making the vertical axis that selects the collection, and then add the horizontal game selection after that. I'll write a rough initial structure first, as once you have the basic layout done, you can tweak the elements as much as you want.
Vertical axis
A simple type for laying out a variable amount of items with one of them being selected is ListView. I set it up so it takes the whole lower half of the screen:
import QtQuick 2.0

FocusScope {

    ListView {
        id: collectionAxis

        anchors.left: parent.left
        anchors.right: parent.right
        anchors.top: parent.verticalCenter
        anchors.bottom: parent.bottom
    }

}
One element of this collection axis will have 180px height and the width is the whole width of the screen. I'll create a placeholder for now and add a fake model (a series of numbers) for testing (so you can see that they indeed come in order, and the ListView has the correct amount of items):
import QtQuick 2.0

FocusScope {

    ListView {
        id: collectionAxis

        anchors.left: parent.left
        anchors.right: parent.right
        anchors.top: parent.verticalCenter
        anchors.bottom: parent.bottom

        model: 10 // just some random number
        delegate: Rectangle {
            width: ListView.view.width
            height: vpx(180)

            color: "blue"
        }
    }

}
If you now refresh Pegasus, you'll see the lower half of the screen turned blue. Yay!
vpx
The function vpx is what you can use for virtual pixel values. It scales up or down the pixel value you put into it depending on the actual screen resolution.
delegate
The visual element of a list is called delegate. For every data item of the model (in this case, for every number between 0 and 9), a delegate will be created.
The code looks good so far, I'll just make a small change: the delegate will likely get more complex later, so to make it easier to read, I'll move it out into a separate Component:
import QtQuick 2.0

FocusScope {

    ListView {
        id: collectionAxis

        anchors.left: parent.left
        anchors.right: parent.right
        anchors.top: parent.verticalCenter
        anchors.bottom: parent.bottom

        model: 10
        delegate: collectionAxisDelegate
    }

    Component {
        id: collectionAxisDelegate

        Rectangle {
            width: ListView.view.width
            height: vpx(180)

            color: "blue"
        }
    }

}
Tip
Component is a special element that defines a QML document. Actually, you could even move the Rectangle to a new file (eg. CollectionAxisDelegate.qml) and use the file's name to set the delegate (eg. delegate: CollectionAxisDelegate { }).
Horizontal axis
The rows of the collection axis will consist of two things: a Text label that shows the collection's name and a ListView that shows its games. Because a Component can have only one child, I'll turn the Rectangle into an Item (an otherwise invisible container), and put a Text and a ListView into it.
Note
Just as individual QML files can have only one root element, Component can have only one child.
First I'll add the collection label:
import QtQuick 2.0

FocusScope {

    ListView {
        id: collectionAxis

        // ...
    }

    Component {
        id: collectionAxisDelegate

        Item {
            width: ListView.view.width
            height: vpx(180)

            Text {
                id: label

                // `modelData` is the item in the list's model
                // for which this delegate is created for;
                // in this case a number between 0-9
                text: modelData

                // white, bold 18px font, using Pegasus' default font family
                color: "white"
                font.pixelSize: vpx(18)
                font.family: globalFonts.sans
                font.bold: true

                // make the line height 45px high
                // and center the text vertically in it
                height: vpx(45)
                verticalAlignment: Text.AlignVCenter
            }
        }
    }

}
If you refresh the theme in Pegasus, you'll now see the numbers "0" and "1" at where we'd expect the labels.
I'll now add the horizontal ListView:
Component {
    id: collectionAxisDelegate

    Item {
        width: ListView.view.width
        height: vpx(180)

        Text {
            id: label
            // ...
        }

        ListView {
            id: gameAxis

            // span from left to right, from the label's bottom to the row's bottom
            anchors.left: parent.left
            anchors.right: parent.right
            anchors.top: label.bottom
            anchors.bottom: parent.bottom

            // this one goes horizontal!
            orientation: ListView.Horizontal
        }
    }
}
We'll need a model and a delegate item to actually see something. Let's create some dummy items:
import QtQuick 2.0

FocusScope {
    // ...

    Component {
        id: collectionAxisDelegate

        Item {
            // ...

            ListView {
                id: gameAxis

                anchors.left: parent.left
                anchors.right: parent.right
                anchors.top: label.bottom
                anchors.bottom: parent.bottom

                orientation: ListView.Horizontal

                model: 20
                delegate: gameAxisDelegate
                spacing: vpx(10) // some spacing to make it look fancy
            }
        }
    }

    // this is one item of the horizontal axis, ie. a "game box"
    Component {
        id: gameAxisDelegate

        Rectangle {
            // as we calculated previously
            width: vpx(240)
            height: vpx(135)

            color: "green"

            Text {
                // will become a number between 0-19
                text: modelData
            }
        }
    }

}
And here's how it should look so far:
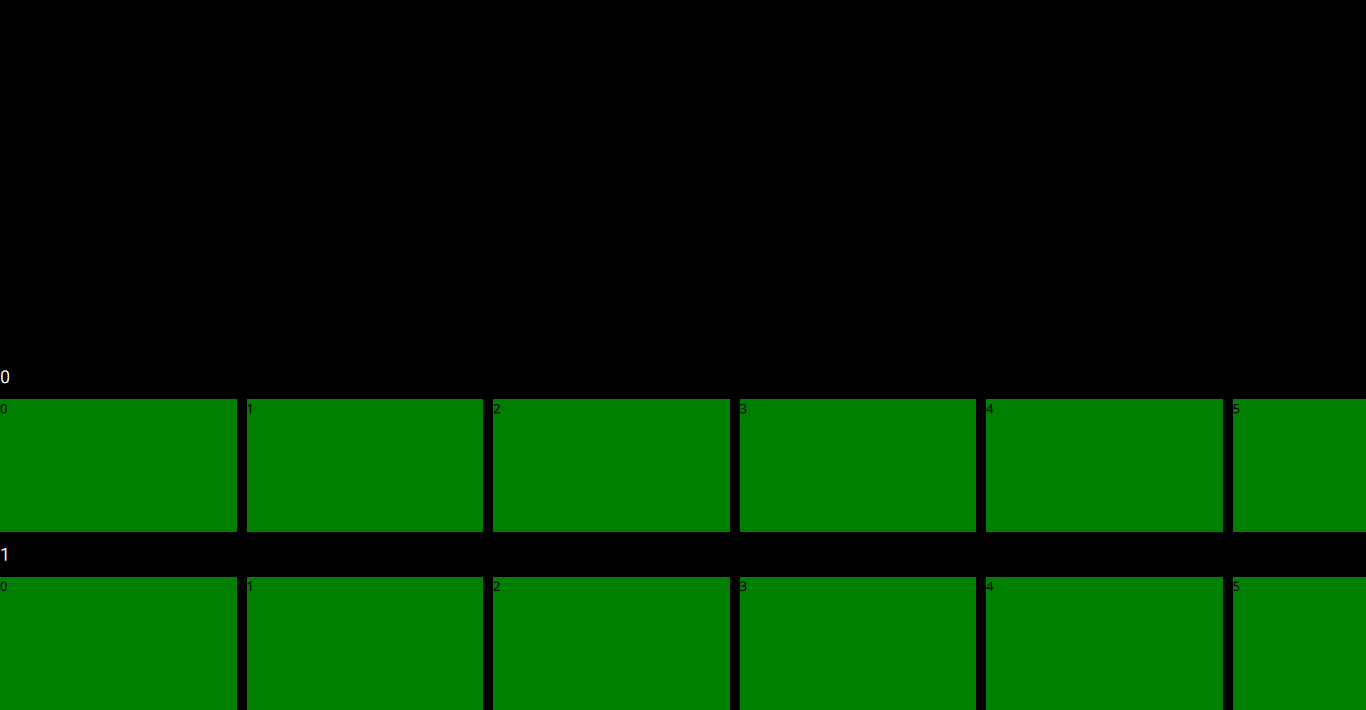
Not the most beautiful yet, however with this we're done with the basics of the main layout. From now on we'll just have tweak these lists and delegates, then add some simple components for the metadata.
The code so far #1
Here's the whole code so far (without comments to save space):
The code so far #1
import QtQuick 2.0

FocusScope {

    ListView {
        id: collectionAxis

        anchors.left: parent.left
        anchors.right: parent.right
        anchors.top: parent.verticalCenter
        anchors.bottom: parent.bottom

        model: 10
        delegate: collectionAxisDelegate
    }

    Component {
        id: collectionAxisDelegate

        Item {
            width: ListView.view.width
            height: vpx(180)

            Text {
                id: label

                text: modelData
                color: "white"
                font.pixelSize: vpx(18)
                font.family: globalFonts.sans

                height: vpx(45)
                verticalAlignment: Text.AlignVCenter
            }

            ListView {
                id: gameAxis

                anchors.left: parent.left
                anchors.right: parent.right
                anchors.top: label.bottom
                anchors.bottom: parent.bottom

                orientation: ListView.Horizontal

                model: 20
                delegate: gameAxisDelegate
                spacing: vpx(10)
            }
        }
    }

    Component {
        id: gameAxisDelegate

        Rectangle {
            width: vpx(240)
            height: vpx(135)

            color: "green"

            Text {
                text: modelData
            }
        }
    }

}