Translations
Pegasus supports most languages in use, and you can easily add new translations for any locale. The translations are stored in simple text files in XML format, so the only thing you need is a text editor. There's also a graphical tool to make things easier (see below). The translations themselves are collected in a separate repository here, which is also included as a Git submodule in the main Pegasus repo.
In short
- (optional) download the Qt tools
- download the translation repo
- create a copy of
pegasus_en.tsfor your language - open the new file in Qt Linguist or your editor of choice, and translate the strings
- open a new issue in the translation repo and attach your TS file
Todo
In the future, there'll be likely some kind of online site for managing translations.
File format and name
The translation files are text files in XML format, encoded in UTF-8. Their file name includes the BCP47 language tag of the locale the they're made for. Usually this means the following structure:
pegasus_[language][-script][-country].ts
where
languageis the language code, mentioned above. Two- or rarely three letters, lowercase.- optionally,
scriptdefines the writing system, like simplified/traditional chinese or Old German Runes. Four letters, title case. - optionally,
countrydefines regional settings, which affects things like date format, usually. Two letters, uppercase.
for example, hi-Deva-IN means Hindi language, Devanagari script, and the regional settings of India. Usually though the two letter language code is enough for most locales.
Two letter language codes can be found here, and four letter script codes here.
1. Preparing the tools
You can use any decent text editor to edit the files. There's also a graphical translation tool called Qt Linguist:

Qt Linguist is included with Qt, see here. After installation, search for linguist in the installation directory of Qt (Linux) or the Start menu (Windows).
2. Prepare the translation files
You can find the translation files in this repository. If you have no experience with Git, just click on the green Clone or download button, then Download ZIP.
Then, create a copy of pegasus_en.ts, and change en to your locale's code (see above).
Developer note
You can create this file with lupdate ../src -ts pegasus_en.ts -no-obsolete.
3. Translate the file
Open your new file in a text editor or in Qt Linguist.
If you're using a text editor, the translatable strings are inside <message> tags: you can see the original text in the <source> tag, and you can provide your translation in <translation>. Also change the language tag on the top of the file (<TS ...>).
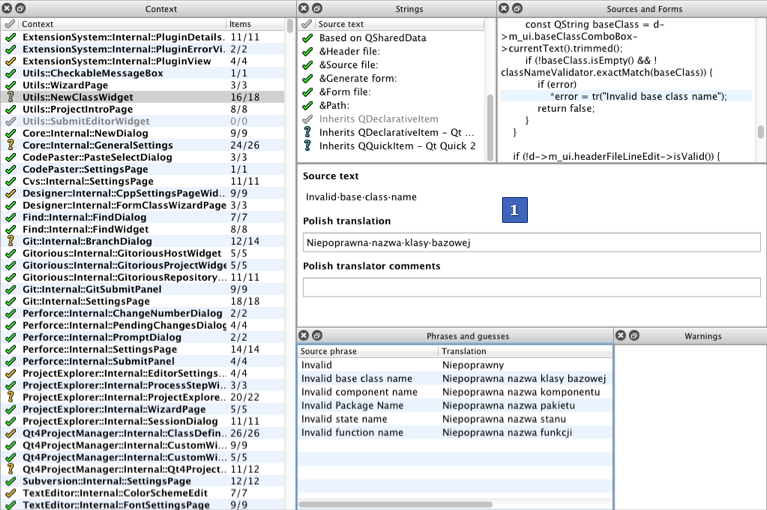
If you're using Qt Linguist, first set your language in Edit -> Translation file settings -> Target language. After that, you can select a "module" (group of texts) on the left, then see the relevant strings in the upper-middle panel. You can add the translation in the center panel (marked with "1" on the picture above). Then press the green checkmark on the top toolbar (or press Ctrl+Enter) to jump to the next untranslated line.
A detailed guide for Qt Linguist can be found here.
Help
%1,%2, ... in the text is a placeholder for additional values, such as numbers, file names, etc.- screenshots for most of the translatable text can be found here
4. (optional) Rebuild Pegasus and test the translation
At the moment, all translation files must be built into Pegasus. See the build documentation about how to rebuild the program.
There's also a file called translations.qrc.in in the translations repository which lists the language files. It's another XML file that you can open in a text editor; simply add a new <file>pegasus_LOCALECODE.qm</file> entry (note the QM extension!).
Note
This step is only required for trying out the translation in-app. You can safely skip it if you don't want to deal with building Pegasus.
5. Open a pull request
If you know Git, open a pull request in the translations repository. Alternatively, open a new issue and attach your translation (TS) file.